- Published on
A LiveWire Component to Check the Ping
![]()
Livewire component that checks the ping every 1 second after the user clicks the button. It's simple and only takes a few minutes to add.
We; the developers depend on our browsers, IDEs, and frameworks' dev tools to help us debug and fix the issues we face during our development process. However, these tools don't always get us what we're looking for and thus we need to create our own sometimes.
Problem
Browser dev tools include the time taken for a request to be completed. The problem though is that they don't provide a ping check for the developer to watch their ping while developing as most video games do.
So, is there a way for us to watch the ping to our server while working on our web app? Can we do that without manually sending a request and looking at the time column in the browser's dev tools?
Solution
With Livewire and its server-side rendering, we're going to create our own 'Ping' component that will automate the ping process for us.
Create a component
To begin with, we're going to create a new Livewire component by calling the following command in our terminal.
php artisan make:livewire counterThis will create 2 files for us. One is the component itself /app/Http/Livewire/Ping.php and the other is the view /resources/views/livewire/ping.blade.php.
Include the component
The next thing we need to do is include the component in our page.
By navigating to the page and adding <livewire:ping /> where we want, a ping component will be displayed.
<html>
  <head>
    ... @livewireStyles
  </head>
  <body>
    @livewireScripts
    <livewire:ping />
  </body>
</html>
Add the functionality
Having the component displayed, now we're ready to add the functionality.
As a quick definition, a ping is a request/response cycle that checks if the server is up and at the same time calculates the time needed for a request to be completed.
In livewire, there are 4 steps to complete a ping.
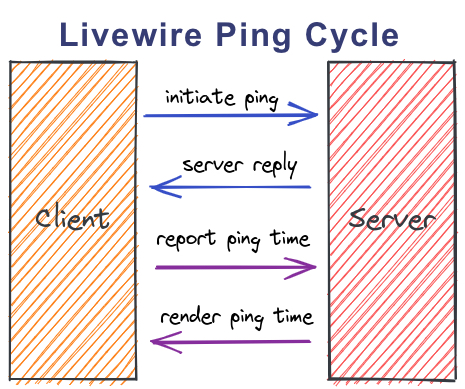
So let's start with the first step.
1. Request from Client
Open the ping.blade.php file and add the following code.
<div>
  <button wire:click="$toggle('show')">{{ $show ? 'Stop Ping' : 'Ping' }}</button>
    @if ($show)
        <div wire:poll.1000ms="getPing">{{ $ping }}</div>
    @endif
</div>
In the above code, the button has a wire:click attribute which triggers a Livewire event on click. The event wired is $toggle('show'). The $toggle(property) is a magic action that toggles boolean properties on or off. In this case, we're toggling the show property.
Under the button, we have a div shown only when the show property is true. The wire:poll.1000ms attribute is used to trigger a Livewire event every 1 second. The event wired is getPing. In the div, we're also showing the ping value.
Note: Polling for changes over Ajax is a lightweight, simpler alternative to something like Laravel Echo, Pusher, or any WebSocket strategy.
2. Reponse from Server
Now, we open Ping.php and add the following code.
public $show = false;
public $ping = 'Pinging...';

public function getPing()
  {
    return true;
  }
show is a boolean property used to toggle the visibility of the div that has a livewire poll and includes the ping value.
$ping is a variable that will be used later in the view to display the ping.
getPing is the function we're calling from the view and it returns true as a simple response.
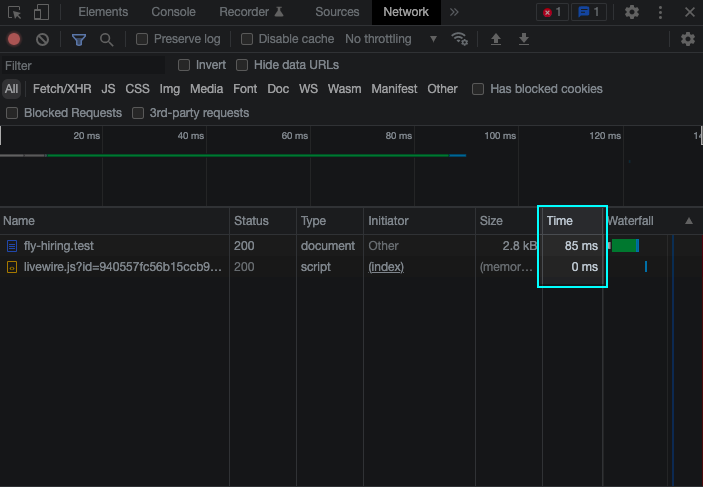
After adding the above code, we're ready to test the request/response cycle. We can test it by clicking the button and seeing a 'Pinging...' value. If we check the Network dev tools, we'll be able to see the ping request is sent every 1 second.
This means it's working!
3. Calculating the Time and Reporting to Server
To calculate the time difference between the request and the response, we store the time of the initial request and the time of the response then subtract them. This will be done in the ping.blade.php using Livewire javascript hooks.
By adding the following code,
<script>
  document.addEventListener("DOMContentLoaded", () => {
      var ping = new Date()
      var pong = new Date()
      Livewire.hook('message.sent', (message, component) => {
          if (message.updateQueue[0].payload.method == 'getPing')
              ping = new Date()

      });
      Livewire.hook('message.received', (message, component) => {
          if (message.updateQueue[0].payload.method == 'getPing') {
              pong = new Date()
              @this.ping = `${pong - ping} ms`
          }
      });
  })
</script>
Livewire.hook('message.sent', (message, component) => {...}) is a Livewire event that is triggered when a message is sent to the server. In the above code, we're listening to the message.sent event and when the message is sent, we're checking if the message is a getPing message. If it is, we're storing the time of the request. Livewire sends some other events including toggling the $show property and updating the $ping property which we don't need to use in the hook.
Livewire.hook('message.received)' (message, component) => {...}) is a Livewire event that is triggered when a message is received from the server. In the above code, we're listening to the message.received event and when the message is received, we're checking if the message is a getPing message. If it is, we're storing the time of the response.
4. Rendering the view
Having the time of the request and the time of response, we can calculate the time difference which is basically the ping.
In the above script tag, we have the @this.ping. @this is the Livewire Javascript component instance.
Note: Because Livewire has both a PHP AND a JavaScript portion, each component also has a JavaScript object. You can access this object using the special @this blade directive in your component's view.
'@this.ping = ${pong - ping} ms' calculates the time difference between the request and the response and sets the ping property to the value.
Conclusion
The Ping.php file is now complete and looks like this.
<?php

namespace App\Http\Livewire;

use Livewire\Component;

class Ping extends Component
{
    public $show = false;
    public $ping = 'Pinging...';

    public function getPing()
    {
        return true;
    }

    public function render()
    {
        return view('livewire.ping');
    }
}
The ping.blade.php should be like this.
<div>
    <button wire:click="$toggle('show')">{{ $show ? 'Stop Ping' : 'Ping' }}</button>
    @if ($show)
        <div wire:poll.1000ms="getPing">{{ $ping }}</div>
    @endif
    <script>
        document.addEventListener("DOMContentLoaded", () => {
            var ping = new Date()
            var pong = new Date()
            Livewire.hook('message.sent', (message, component) => {
                if (message.updateQueue[0].payload.method == 'getPing')
                    ping = new Date()

            });
            Livewire.hook('message.received', (message, component) => {
                if (message.updateQueue[0].payload.method == 'getPing') {
                    pong = new Date()
                    @this.ping = `${pong - ping} ms`
                }
            });
        })
    </script>
</div>
And that's it! Now we have a component that can be used to check the ping of our server so let's try it out.
Open the page in your browser and click the 'Ping' button.
✅ 'Ping' button changed to 'Stop Ping'
✅ Ping updating every 1 seconds
✅ Dev tools show 2 requests every 1 second 'one for getting the ping and the other for rending the view'
Woohoo! It works! Now it feels like I'm gaming and not coding.
Discussion
Which Livewire features did we use today?
wire:clickevent for triggering a Livewire event$toggle('property')magic action for toggling a Livewire propertywire:poll.1000ms="method"directive for polling for changes over AjaxLivewire.hook('message.sent', (message, component) => {...})&Livewire.hook('message.received',(message,component) => {...})javascript hooks for listening to Livewire events
Livewire has a lot of other features that we didn't use today including validation, file uploads, flash messages, traits, and more.
#Other usage
How can we make this component UI/UX friendly? Which CSS framework do we use? Guess what? Now the component is in your hands to tinker and make it as beautiful as you want!
The 'Ping' component can always be edited to automate requests and responses where we can check for new updates without manually clicking buttons.
Happy coding!
Open Source
The whole project is an open-source project under the MIT License. If you find my content useful, please follow me on Github or Twitter